My Terms Of Use

These tutorials are copyrighted to Kaye @ Kaye’z Designz. You may print them out for personal use but do not post to any site or distribute as your own. Any resemblance to others online is purely coincidental.

Thursday, August 26, 2010

Blowing in the Wind

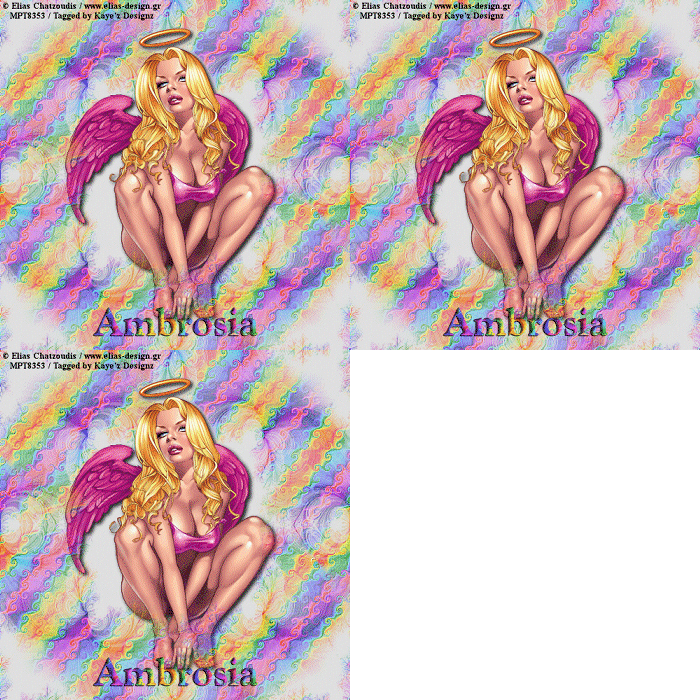
2010 08 26a Blowing in the Wind 01b

This tutorial is copyrighted to Kaye @ Kaye'z Designz. You may print out for personal use but do not post to any site or distribute as your own. Any resemblance to others online is purely coincidental.
Supplies Needed: Paint Shop Pro any version, I used X3. You can get it from COREL. Tube of choice. I used one by Elias Chatzoudis, you must purchase a license from MPT to use. You may use your own color, gradient or pattern, I used a pattern I created. Mask of choice. I enclosed one you can use. Font of choice, I used CordialBlk which came with a program installed on my computer but I don’t know which one. Notes: Open supplies in PSP. Open font and minimize to task bar. SAVE OFTEN.

STEP 1 Open new canvas 500 X 500, Resolution 72.0. Flood Fill with color, gradient or pattern of choice. I used #E0E0E0. Name this layer BG.

STEP 2 Add a New Layer. Flood Fill with pattern of choice, I used a pattern I created. Apply mask of choice. Merge Group. Name this layer mask.

STEP 3 Copy and Paste tube of choice. Resize if needed. Drop Shadow of choice, mine was 3, 3, 65, 8, Black. Name this layer tube.
Move it below mask layer. Select All, Float, Defloat. Activate the mask layer and Erase the mask from around the head area.

STEP 4 Add any elements of choice.

STEP 5 Grab your Text Tool with font and size of choice. Vector, Size depends on font used, Bold, Stroke of choice, for Fill I used same pattern. Type your text. Add Inner Bevel of choice. Add Drop Shadow of choice. Name this layer text.

STEP 6 Resize tag for group requirements.
Add your watermark And artist’s copyrights.

STEP 7 Save as .pspimage to retain layers for future changes. Save as .jpg using Jpeg Optimizer to send thru your group.

TO ANIMATE

STEP 1 Activate the tube layer. Using the Freehand Selection Tool, Point to Point go around parts of the hair you would like to “blow”.
Duplicate the layer 2 times for a total of 3 layers.

STEP 2 Activate bottom tube layer and go to Effects / Plugins / Eye Candy 4000 / Jiggle: Bubbles, 13.50, 2, 6, Seamless Tile unchecked, Random Seed 1. If you don’t have EC 4000 try EC 3.1. You may have to play with the settings.
Move up to copy of tube layer and repeat Eye Candy effect but click on Random Seed once. Do the same to copy (2) of tube layer, repeat Eye Candy effect but click on Random Seed once again.

STEP 3 Hide copy and copy (2) of tube layer. Copy Merged, go to Animation Shop and Paste as New Animation.

STEP 4 Hide original tube layer, unhide copy of tube layer. Copy Merged, go back to Animation Shop and Paste after Current Frame. Do the same with copy (2) of tube layer.
View Animation. For a strong wind you can leave Frame Speed at 10 or if you want a lighter wind change Frame Properties to a higher number. I used 30.

STEP 5 When happy Save As .gif file with these settings: Slider all the way at top for Better Quality. Under Colors tab: 255 colors, Optimized Octree, Error Diffusion. Under Optimizations tab: Check Write minimal frames and Map Identical Pixels other boxes should be unchecked.

All done! I hope you have enjoyed my tutorial. Remember this is just a guide. Experiment using different colors, gradients or patterns, images and settings. Any questions or if you would like to show me your results, you can reach me at kayewinters@zoomtown.com. This tutorial was written 8/26/10 by Kaye'z Designz.

Sunday, August 15, 2010

Video Montage


This tutorial is copyrighted to Kaye @ Kaye'z Designz. You may print out for personal use but do not post to any site or distribute as your own. Any resemblance to others online is purely coincidental.
Supplies Needed: Paint Shop Pro any version, I used X3. You can get it from COREL. 4 or 5 images of choice and a camcorder tube. I used some fall photos I took a few years ago. You may use your own color, gradient or pattern, I used a sunset and autumn image to create a 3rd image using Arithmetic. Font of choice. Notes: Open images in PSP. Open font and minimize to task bar. SAVE OFTEN.

STEP 1 Open new transparent canvas 500 X 500, Resolution 72.0. Flood Fill with color, gradient, pattern or scrap kit paper of choice.
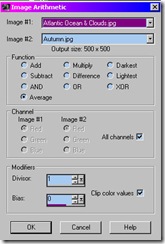
I took 2 separate images and created a 3rd image with Image / Arithmetic using settings shown. Make sure larger image is in top box where it says Image #1. Copy.

Arithmetic Settings STEP 2 On working canvas Select All and Paste into Selection (Ctrl + Shift + L). Name this layer BG.

STEP 3 Copy and Paste camcorder as New Layer, Resize 60%. Drop Shadow of choice, mine was 3, 3, 65, 8, Black. If using my supplies move camcorder to lower left side to cover part of the dark area. Name this layer camcorder.

STEP 4 On same layer take your Magic Wand: Tolerance 10, Feather 0 and click inside camcorder window. Hit your Delete key.
While still selected add a New Layer and apply Cutout: 0, 0, 100, 25, Black. Keep selected.

STEP 5 Expand Selection by 5 or 10 pixels. Go below camcorder and add New Layers for each of your chosen images. Copy one of your images and Paste into Selection on first new layer. Continue with each different image until you have all your new layers filled. I named my layers frame1, frame2, etc. Deselect.

STEP 6 Add any other elements you would like to complete your tag.

STEP 7 With your Text Tool, using font and settings of choice type your text. I used Coolsville, size 60. Stroke 0.5 and for fill I made Seamless Tile with default settings out of my Arithmetic BG. I can’t share font since I’m not sure where it came from.

STEP 8 Resize tag if necessary for group requirements.
Add any copyright information, your watermark and / or your name.

STEP 8 Save as .pspimage to retain layers for future changes. If you wish to animate continue.

TO ANIMATE

STEP 1 Open Animation Shop click on Propagate Paste icon. Back in PSP close off all your camcorder images (from Step 5) except for bottom one.

STEP 2 Copy Merged, go to AS and Paste as New Animation.

STEP 3 In PSP close bottom camcorder image and open next one up. Copy Merged.

STEP 4 In AS Paste after Current Frame. Repeat until you have all your camcorder images in AS.

STEP 5 Select frame1 and then Select All (Ctrl + A). Change Frame Properties to 50 or 60.

STEP 6 View Animation and if happy Save As .gif file with these settings: Slider all the way at top for Better Quality. Under Colors tab: 255 colors, Optimized Octree, Error Diffusion. Under Optimizations tab: Check Write minimal frames and Map Identical Pixels other boxes should be unchecked.

If you would like to add a butterfly like I did and animate follow next steps.

STEP 1 Find a butterfly that is not rotated and doesn’t have a Drop Shadow. Copy and Paste in Animation Shop. Turn on Propagate Paste in AS if not already on.

STEP 2 Go to File / New and create a New Canvas slightly larger than your butterfly. Paste butterfly on new canvas.

STEP 3 Go to Effects / Insert Image Effect / Compress: Start with Animation Frame, Effect Length: 2.0 secs, Frames per Second: 2 fps which will give you 4 frames + 1. If you added more images than I did adjust the Frames per Second to match your number of frames.

STEP 4 Click on Customize and use Horizontal and Canvas Color. Click OK, OK. Delete Frame1.

STEP 5 Go to Animation / Rotate: Left, 45 Degrees, nothing else checked.

STEP 6 Use Crop Tool and Crop Around Opaque Area. I pulled the bounding box out about 1 square on all 4 sides to give a little more room. Double click to apply Crop.

STEP 7 Select All, Copy and Paste into Selected Frame (Ctrl + E) and place where you like on main canvas.

All done! I hope you have enjoyed my tutorial. Remember this is just a guide. Experiment using different colors, gradients or patterns, images and settings. Any questions or if you would like to show me your results, you can reach me at kayewinters@zoomtown.com. This tutorial was written 8/16/10 by Kaye'z Designz.