My Terms Of Use

These tutorials are copyrighted to Kaye @ Kaye’z Designz. You may print them out for personal use but do not post to any site or distribute as your own. Any resemblance to others online is purely coincidental.

Wednesday, June 24, 2009

Funhouse Cirquelate


This tutorial is copyrighted to Kaye @ Kaye’z Designz. You may print out for personal use but do not post to any site or distribute as your own. Any resemblance to others online is purely coincidental.
Supplies Needed: Paint Shop Pro any version, I used X2. You can get it from
COREL. Tube of choice. I used one by Keith Garvey, it can be purchased at My PSP Tubes. You may use your own color, gradient or pattern. Font of choice or use mine Storybook. Mask of choice or use mine WSL004 by WeeScottLass. Supplies.
Notes: Open tube in PSP. Open font and minimize to task bar. Save often.

Step 1 Open new canvas 500 X 500. Flood Fill with pattern of choice. I used LOTR 02 Name this layer BG.
Step 2 Add a New Layer. Flood Fill with another pattern of choice. I used Colorful Fae.
Apply Funhouse / Cirquelate: 21. Apply FM Tile Tools / Blend Emboss default settings. Apply mask of choice. I used WSL004 with Invert Mask Data checked. Merge / Merge Group. Name this layer mask.

Step 3 Copy and Paste tube of choice. Drop Shadow of choice, mine was 3, 3, 65, 8, Black. Move below mask layer. Name this layer tube.
Step 4 Active mask layer. Grab your Text Tool with font and size of choice. I used Storybook, Vector, Size 65, Bold, Stroke 0.5 black, for fill I used same pattern used on mask layer. Type your text. Add Inner Bevel of choice. I used Bevel #2, 9, 0, 2, 0, 0, White, 315, 50, 30. Add Drop Shadow of choice. I used 2, 2, 65, 5, Black. Name this layer text.
Step 5 Add your name and / or watermark. Add any copyrights if required.
Step 6 Optional: Add border of choice. I activated the mask layer and went to Selections / Select All. Selections / Modify / Contract by 10. In layer palette right click on mask layer and Promote Selection to Layer. Apply Inner Bevel of choice. I used same settings as Step 4. Selections / Invert and apply Cutout of choice. Mine was 0, 0, 60, 30, Black. Deselect. Name border. Save as .pspimage to retain layers for future changes. Save as .jpg using Jpeg Optimizer to send thru group.


All done! I hope you have enjoyed my tutorial. Remember this is just a guide. Experiment using different colors, gradients or patterns, images and settings. Any questions you can reach me at
kayewinters@zoomtown.com. This tutorial was written 3/13/09 by Kaye’z Designz.

Marilyn


This tutorial is copyrighted to Kaye @ Kaye’z Designz. You may print out for personal use but do not post to any site or distribute as your own. Any resemblance to others online is purely coincidental.
Supplies Needed: Paint Shop Pro any version, I used X2. You can get it HERE. Tube of choice. I used one from Gennadiy Koufay which can be purchased HERE. Brushes of choice or use mine BestOfSparkles - Patslash_03 & 04.PspBrush & PspScript. I have also included the original .pngs the brushes were made from. Font of choice or use mine Broadway. Supplies.
Notes: Open tube in PSP minimize. Open font and minimize on Task Bar and it will be available when needed.

Step 1 Open two .pngs from supplies to create your brushes. Or you can use tube(s) of choice to create your brush. To create brush from .pspimage or .png image. Go to File / Export / Custom Brush. When pop-up box appears under Name give it same name as original image. Skip Author & copyright unless you created the brush yourself. Under Description put where you got the brush, i.e. lesson or tutorial it came from. Click on Edit Paths to make sure brush is saved to brush folder you want.
Step 2 Open new canvas 500 X 500. Flood Fill with black. Name this layer BG.
Step 3 Add a New Raster Layer. In Material Palette, top box, select a color, gradient or pattern for your brush color. I used Rainbow Pastel gradient set to Linear, Angle 90, Repeats 3, Invert - unchecked. Select Paint Brush icon on Tools Toolbar. Find BestOfSparkles - Patslash_03 brush you just made in Step 1. Or other brush you created. Settings: Round, Size 500, Hardness 100, Step 32, Density 100, Thickness 100, Rotation 0, Opacity 100, Blend Mode - Normal.
Step 4 Have your Rulers on, View / Rulers. Place your brush at top center of canvas and click at least twice without moving mouse. Duplicate this layer. Image / Mirror. Image / Flip. In layer palette right click on duplicate layer and go to Merge / Merge Down. Rename this layer brush1.
Step 5 Add a New Raster Layer. Find BestOfSparkles - Patslash_04 made in Step 1. You can change color, gradient or pattern for this brush. I used same gradient & settings from Step 3. Center this brush on canvas, should be 250 X 250. Click at least twice without moving mouse. Duplicate this layer and Image / Mirror. In layer palette right click on duplicate layer and go to Merge / Merge Down. Rename this layer brush2.
Step 6 Copy and Paste your tube as New Layer. Give tube a Drop Shadow of choice. I didn’t Drop Shadow mine as it was misted. Name this layer tube.
Step 7 Select Text Tool. Add text and / or name with font and size of choice. I used Broadway, size 65. Closed off foreground and used same gradient from Step 3 as background. Go to Effects / 3D Effects / Inner Bevel: Bevel #2, 9, 0, 2, 0, 0, White, 315, 50, 30. Add Drop Shadow: 2, 2, 55, 3, Black. Place where desired.
Step 8 Add your copyrights and / or watermark. Save as .pspimage to make future changes. Use JPEG Optimizer at default settings. Click on curved arrow to get default setting and Save as .jpg to send thru group.

All done! I hope you have enjoyed my tutorial. Remember this is just a guide. Experiment using different colors, gradients or patterns, images and settings. Any questions you can reach me here
kayewinters@zoomtown.com. This tutorial was written 2/16/09 by Kaye’z Designz.

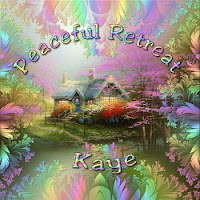
Peaceful Retreat


This tutorial is copyrighted to Kaye @ Kaye’z Designz. You may print out for personal use but do not post to any site or distribute as your own. Any resemblance to others online is purely coincidental.
Supplies Needed: Paint Shop Pro any version, I used X2. You can get it HERE. Misted image or use your own. I also enclosed misted image with background in case you prefer to use it. Flaming Pear Freebies HERE. Scroll down to Free Plugins and download. A mask of choice or use mine kjw-fractal 01 made by me. Font of choice. Supplies.
Notes: Open misted image & mask in PSP, minimize mask. Open font and minimize and it will be available when needed.

Step 1 Open New Canvas 500 X 500 transparent. Copy and Paste misted image as New Layer on canvas. Delete raster 1 layer. Duplicate misted layer. Select original misted layer. Go to Effects / Plugins / Flaming Pear / Solidify B. Click and it will apply itself automatically. Go to Adjust / Blur / Gaussian Blur: Radius 30. Save.
Step 2 Add a New Raster Layer and Flood Fill with color, gradient or pattern of choice. I used Rainbow Pastel gradient with these settings: Radial, Angle 0, Repeats 10, Invert unchecked. Go to Layers / New Mask Layer / From Image. Put a check in Invert Mask Data. Click on Source Window and select kjw-fractal 01 or mask of choice. In layer palette right click on highlighted layer and choose Merge / Merge Group. NOTE: Since the Rainbow Pastel is very light I Duplicated mask layer then Merged Down to darken a little. Add Drop Shadow: 1, 1, 50, 1, Black. Save.
Step 3 Select Preset Shape Tool / Ellipse. Retain Style unchecked. Antialias & Create as Vector checked, Line Style Solid, Width 2. In Material palette set foreground to Black and close off background. Draw oval shape to size 400 X 300. Center on canvas. Have rulers on (View / Rulers). Start at coordinates X50, Y100 draw down and right to coordinates X450, Y400. Watch numbers on status bar at bottom of work space. It should now be centered on canvas. To verify go to File / Script / Run / Center Layer. Duplicate oval and hide in layer palette. We will come back to it shortly. Highlight first oval layer.
Step 4 Select Text Tool with these
settings. In Material palette set foreground and background to color, gradient or pattern of choice. I used foreground Black, background Rainbow Pastel gradient: Linear, Angle 0, Repeats 3, Invert unchecked. Click on oval near top center until A with half circle appears. Type your text. When text is to your liking in layer palette click on plus sign (+) to open layer. Click on eye next to Preset Shape. This will close off oval. If you like add Inner Bevel and Drop Shadow of choice. I used Inner Bevel: Bevel #2, 8, 15, 2, 2, 15, White, 315, 50, 30. And Drop Shadow: 2, 2, 50, 3, Black.
Step 5 (Optional) Unhide 2nd oval layer. Image / Flip. Center on Canvas. Select Text Tool with same settings in Step 4. Click on arrowheads until you see Offset. Change it to -25. If you use different font and size you may need to adjust this setting. This places your text above, on or below the oval. Click on oval at bottom center and type your name. In layer palette click on plus sign (+) to hide oval. Add same Inner Bevel and Drop Shadow from Step 4.
Step 6 Add your copyrights and / or watermark. Save as .pspimage to make future changes. Use JPEG Optimizer at default settings. Click on curved arrow to get default setting and Save as .jpg to send thru group.

All done! I hope you have enjoyed my tutorial. Remember this is just a guide. Experiment using different colors, gradients or patterns, images and settings. Any questions you can reach me here
kayewinters@zoomtown.com. This tutorial was written 2/11/09 by Kaye’z Designz.

Angelic


This tutorial is copyrighted to Kaye @ Kaye’z Designz. You may print out for personal use but do not post to any site or distribute as your own.
Supplies Needed: Paint Shop Pro any version, I used X2. Marway’s mask 045. Water Color BG or one of your choice. Star Border or other elements of choice. Supplies. Tube of choice. I am using the fantastic work of Elias Chatzoudis which you can purchase
HERE.
Notes: Open mask on workspace and use Layers / New Mask Layer / From Image. Invert Mask Data - unchecked, select mask from Drop Down box. Put BG in your pattern folder or open on workspace and use Material Palette to select it.

Step 1 Open 500 X 500 canvas. Flood Fill with white.
Step 2 Add New Layer. Flood Fill with Water Color BG or one of your choice.
Step 3 Go to Layers / Load - Save Mask from Disk: Source Luminance, Fit to Canvas, Hide All Mask - all checked, Invert Transparency - unchecked. Layers / Merge / Merge Group. You can Colorize mask to match your tube.
Step 4 Make sure mask layer is active and go to Effects / Texture Effects / Sandstone: 70, 200, 12, 90, White.
Step 5 Open tube of choice. Edit / Copy (Ctrl+C) tube. On canvas Paste as New Layer (Ctrl+L). Resize if necessary. Add Drop Shadow: 3, 3, 55, 8, Black.
Step 6 Add copyright on New Layer.
Step 7 Add name or any text you want in font & size of choice, I used Times New Roman size 65. Add Inner Bevel: Bevel # 2, 9, 0, 2, 0, 0, White, 315, 50, 30. Add Drop Shadow: 2, 2, 55, 3, Black.
Step 8 To Add a border. Go to Selections / Select All (Alt+S+A). Selections / Modify / Contract by 15 (Alt+S+M). Selections / Invert (Alt+S+I). Flood Fill with Water Color BG or one of choice. Apply same Inner Bevel used in Step 7. Colorize if you like. Selections / Invert (Alt+S+I). Apply Cutout: 0, 0, 65, 30, Black.
Step 9 Add Star Border above mask layer. Or add any other elements of choice to decorate the tag. Add Drop Shadow use same settings as Step 7 to elements.
Step 10 Save as .pspimage to make future changes. Save as .jpg to send thru group.

All done! I hope you have enjoyed my tutorial. Any questions you can reach me here
kayewinters@zoomtown.com. This tutorial was written 2/1/09 by Kaye’z Designz.

Thursday, June 18, 2009

Squares Tut


This tutorial is copyrighted to Kaye @ Kaye’z Designz. You may print out for personal use but do not post to any site or distribute as your own. Any resemblance to others online is purely coincidental.
Supplies Needed: Paint Shop Pro any version, I used X2. You can get it from
COREL. Tube of choice. I used one from CEIStickers, you can purchase here MPT. Pattern of choice or one I used. You may use your own color, gradient or pattern. Square mask in supplies. Font of choice. Supplies.
Notes: Open tube, pattern and mask in PSP minimize. Open font and minimize on Task Bar it will be available when needed. Save often.

Step 1 Open new canvas 500 X 500. Flood Fill with white or color of choice. Name this layer BG.
Step 2 Add New Raster Layer. Flood Fill with brchamp pattern or one of choice. Angle 0, Scale 100.
Step 3 Make sure pattern layer is active. Apply mask of choice. I used Squares (in supplies). Go to Layers / New Mask Layer / From Image: Source Luminance checked, Invert Mask Data unchecked, choose Squares from drop-down box. In layer palette right click and choose Merge, Merge Group. Add Drop Shadow: V & H 1, Opacity 100, Blur 1, Black. Name this layer mask.
Step 4 Copy and Paste your tube as New Layer. Resize if needed, I resized mine by 85%. Add Effects / 3D Effects / Drop Shadow: V & H 3, Opacity 65, Blur 8, Black. Name this layer tube.
Step 5 Select Text Tool. Add text and / or name with font and size of choice. I used Comic Sans Ms, Size 70, Bold, Stroke 0.5, Kearning 50. Colors FG - Black, BG - brchamp pattern or your choice, Angle 0, Scale 100. Place where you like. Optional: Inner Bevel: Bevel #2, 9, 0, 2, 0, 0, White, 315, 50, 30. Drop Shadow: V & H 2, Opacity 65, Blur 5, Black. Name text or name.
Step 6 Add your copyright(s) and / or watermark. Name layers CR and / or WM. Save as .pspimage to make future changes. Use JPEG Optimizer at default settings. Click on curved arrow to get default setting and Save as .jpg to send to group.

All done! I hope you have enjoyed my tutorial. Remember this is just a guide. Experiment using different colors, gradients or patterns, images and settings. Any questions you can reach me at kayewinters@zoomtown.com. This tutorial was written 3/13/09 by Kaye’z Designz.

Cuties in a Twirl


This tutorial is copyrighted to Kaye @ Kaye’z Designz. You may print out for personal use but DO NOT post to any site or distribute as your own. Any resemblance to others online is purely coincidental.

Supplies Needed: Paint Shop Pro any version, I used X2. Color, Gradient or Pattern of choice. Filter Factory B. Alien Skin Eye Candy 5: Impact / Glass. This is a PTU filter and you can find it HERE. Filter Factory B HERE. I would recommend downloading all 20 Galleries so you have on hand. You may need Plugin Commander Light (free) to convert the Filter Factory files into .8bf files. If so you can find it HERE. You will also need a tube / image of choice and font of choice.

Step 1 Open new 500 X 500 canvas and Flood Fill with white, name layer BG for background.
Step 2 Add a New Layer and Flood Fill with your Color, Gradient or Pattern of choice. I used a pattern at Angle 0, Scale 100. Name layer pattern.
Step 3 On pattern layer go to Filter Factory B / Seismic Twirl and use default settings of: 65, 187, 255, 1.
Step 4 Still on pattern layer go to Selections / Select All. Selections / Modify / Contract by 15 (or however wide you want border to be). Selections / Invert. In layer palette right-click on this layer and Choose Promote Selection to Layer. Highlight promoted layer and rename border. Go to Effects / 3D Effects / Inner Bevel: Bevel #1, 1, 25, 6, 15, 35, White, 215, 35, 45. Selections / Invert and go to Effects / 3D Effects / Cutout: V & H 0, Opacity 50, Blur 30, Black.
Step 5 Select your tube Edit / Copy (Ctrl+C). Paste (Ctrl+V) as New Layer on your canvas.
Step 6 (Optional) Go to Alien Skin Eye Candy 5: Impact / Glass: 14.48, 28.42, 13, Inside Selection, White, 0, 0, 1, 22, 51, 28.42, 69.
Step 7 Go to Effects / 3D Effects / Drop Shadow: V & H 3, Opacity 65, Blur 8, Black. You can play around with the settings until you come up with something you like.
Step 8 Add your name and / or text you want using a font and settings of your choice. Give it an Inner Bevel and / or Drop Shadow if you want.
Step 9 Add your copyrights, watermark.
Step 10 Crop and Resize your tag to size acceptable for your group. Save 1 copy as .pspimage in case you want to make any changes. Then go to File / Export / JPEG Optimizer and save to your folder.

All done! I hope you have enjoyed my tutorial. Remember this is just a guide. Experiment using different colors, gradients or patterns, images and settings. Any questions you can reach me here kayewinters@zoomtown.com.This tutorial was written 1/25/09 by Kaye’z Designz.

Wednesday, June 17, 2009

The Cat's Meow


Click HERE to view animation.
This tutorial is copyrighted to Kaye @ Kaye’z Designz. You may print out for personal use but do not post to any site or distribute as your own. Any resemblance to others online is purely coincidental.
Supplies Needed: Paint Shop Pro any version, I used X2. You can get it from
COREL. Tube of choice. You may use your own color, gradient or pattern. Font of choice. Notes: Open tube in PSP. Save often.

Step 1 Open new canvas 500 X 500. Flood Fill with white or color of choice. Name this layer BG.
Step 2 Copy and Paste tube as New Layer.
Step 3 Select Preset Shape Tool - Ellipse. Vector, Line Width 2 black, background null. Draw out circle starting at 100 X 100 to 400 X 400. Use your Ruler as guide. Do Not Convert to Raster Layer. Resize tube and move it to fit inside circle.
Step 4 With Magic Wand click inside circle. Selections / Invert, select tube layer and hit Delete to be sure tube is not outside circle. Selections / Invert again to put marching ants around circle. Selections / Modify / Expand by 1.
Step 5 Add 4 layers below circle but above BG layer. Starting at bottom name them grad1 thru grad4. On these 4 layers click on layer link toggle till there is a 1 in each box. This will prevent layers from moving separately and stop any jumping.
Step 6 On your material palette choose two colors from your tube. Change foreground to back / fore gradient with these settings: Style Radial, Angle 0, Repeats 3, Invert unchecked, Center Point H 50, V 100.
Step 7 Activate grad1 layer, should be the bottom one. Flood Fill with gradient. Move up 1 layer and in material palette change Repeats to 5. Do this for the other two layers changing Repeats to 7 and 9. Deselect.
Step 8 Go to your tube layer and with Magic Wand select parts to add Noise to, I selected the eyes. Duplicate 3 times for total of 4. Click on layer link toggle till there is a 2 in each box to prevent jumping.
Step 9 Activate bottom tube layer. Go to DSB Flux / Bright Noise: Intensity 35, Mix ticked. Keep moving up one layer and increase Intensity by 5 on remaining tube layers, leave Mix ticked. Deselect.
Step 10 Go to your vector circle. Select your Text Tool use font and size of choice. Hover the cursor over circle until you get an A with half circle under it. Type your text and when it is to your liking click on plus sign in layer palette and close off circle by clicking on the eye. Optional: Add Inner Bevel and Drop Shadow of choice.
Step 11 Add your name and / or watermark. Add any copyrights if required. Save as a .pspimage for future use.

ANIMATION
Step 1 Open Animation Shop. Back in PSP close off grad2, 3 & 4 and also copy of tube, copy (2) of tube and copy (3) of tube. Copy Merged, Go to Animation Shop and Paste as New Animation. Back in PSP close off grad1 and tube layers. Open next layer up (2) and Copy Merged return to Animation Shop and Paste after Current Frame.
Step 2 Continue this selecting copies 3 and 4 and closing previous layers as you go until you have 4 frames in Animation Shop. Click on Filmstrip icon to View Animation. If you like what you have save animation. When you click on Save you will be presented with several screens.
Step 3 On the first one push slider all the way to top. Click on Customize. Under Color Tab: Number of colors should be 255, Optimized Octree and Error Diffusion should be checked. Under Optimization Tab: Check 3 middle boxes and leave top and bottom boxes unchecked. Click Next, Next, Next this screen will show optimization results which shows the difference between current file and optimized file. Look at size of optimized file if this file is still too big cancel out of save and go back and resize or cull the animation. If size is okay click Finish.

All done! I hope you have enjoyed my tutorial. Remember this is just a guide. Experiment using different colors, gradients or patterns, images and settings. Any questions you can reach me at kayewinters@zoomtown.com. This tutorial was published 6/16/09 by Kaye’z Designz.